My experience with setting up Selenium Grid was frustrated by the lack of information available about exactly what I needed to do to get this working.
I’ve actually had this working for a while now and I’ve set it up, or helped others set it up now, several times. So, I guess it is time to write a post about it so I can just send people here when I need to explain the setup.
Note, the following discussion already assumes you know something about how to use Selenium without the Grid so there won’t be a lot of code here other than what is need to get the Grid up and running so you can run your test on it. First, we need to discuss the basic configuration of a Selenium Grid setup. There are two main parts. A Selenium Hub, and Selenium Nodes. The Hub is what your test code will talk to. Think of it as the traffic cop to all the browsers you want to test.
The Selenium Nodes register themselves with the Hub and tell the Hub what browsers they support.
You will only have one Hub, but you might have multiple nodes. In my basic configuration, I have two nodes running on the same computer as my Hub that support the current version of FireFox and the current version of IE, since those are the only browsers that are officially supported by the organization I am working at. (These are private sites, and yes, everyone knows Chrome is better than either of those, but you know how fast policies change in large organizations.) OK, so much for theory, here is how to setup your system.
First, on the computers that you will be running the Hub and the Nodes on, create a directory to hold all the files you will need. I generally put all of my files in c:\selenium. It makes them really easy to find.
Since the Selenium Grid runs using Java, make sure you have that installed on the computers you need to run the Hub and Nodes on.
OK. Enough setup. Now for the actually Selenium Grid files you are going to need.
Download the selenium server JAR file. There is a link to it under the “Selenium Server” section of this page: http://www.seleniumhq.org/download/. The current file name is “selenium-server-standalone-2.44.0.jar”. Place the file in the selenium directories you created. This is the jar file you will run for both the Hub and the Nodes so you’ll need this on every computer you plan to run the Grid on.
For the various browsers you want to run on that need a separate driver, like IE, you’ll also want to download and install the appropriate driver server from that same page and place the EXE on the computer that you plan to run that browser on.
Now to get this running.
You’ll want to put the following in a cmd file and place the cmd file in the Selenium directory with all the other stuff on your Hub computer:
1 | "{path to your java directory}\java.exe" -jar |
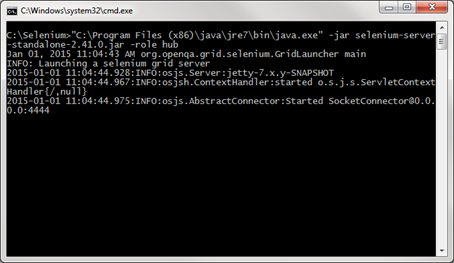
This will run the Hub on port 4444. This is all you need to do. You should end up with a console window that looks like this:  The next script you will need to create is the script that will run the node. Since I only need FireFox and IE11, I run this on the same computer. I’ll first provide you with that script and then explain it so that you can adapt it for your own situation.
Here’s the script:
1 | "{path to your java directory}\java.exe" -jar |
The first thing you should note is that we’ve specified the role as “node” with the –role node flag.
Since we are a Node, we also have to tell the node where the Hub is so that it can register itself with the Hub. That is what the –hub http://localhost:4444/grid/register/ parameter is for. If you are placing a node on a computer other than the same computer as the Hub, you will obviously need to change the URL to point back to the Hub computer instead of localhost.
Everything past this point tells the Hub what browsers are supported on this Node. So, you’ll notice we have two –browser parameters. One for FireFox and one for IE. The browser parameter is all one long string. To specify IE, you’ll want to specify “internet explorer”. Note the quote marks and the space. It took me a while to figure this part out. The next browser parameter is maxInstances and it tells the Hub how many instances of the browser can run on this node. I hardly ever have more than one running at a time, but specifying 5 allows me to run test even if something goes wrong. If something does go wrong, the instance will eventually close itself.
The next parameter, platform, tells the Hub what platform we are running on. You may not need this if all of your platforms are the same. But if you are running FireFox on Mac, Windows, and Linux, you’ll want to specify this.
Since I only ever test the most recent version of FireFox, I haven’t specified a version for FireFox, but for IE, there was a time when I was testing IE11 and IE8. So, I have the version, 11, specified here for IE to tell the hub that this node runs IE11.
The final parameter it took me quite a while to figure out was the –Dwebdriver.ie.driver. This is how you tell the Node where the IEDriverServer lives. I imagine there is a similar parameter for the other drivers as well.
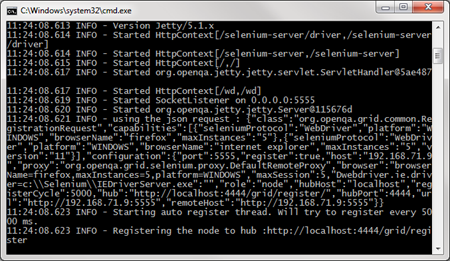
When you run this code, it will look something like this:

If you need the –Dwebdriver config information for another browser, you can google for Dwebdriver, and you should be able to find it. Since the only officially supported Selenium driver is the IE driver, the config for the others may depend on the vendor who supplied the driver. Oh, the joys of open source.
And now, of course, to use all of this, you’ll need to specify in your code that you want to use the Grid drivers and through that, you’ll specify what browser you want the code to run on.
1 | var driver = new RemoteWebdriver( |
Or
1 | var driver = new RemoteWebdriver( |
Finally, someone might say, “so why go to all this trouble when you could just use something like SauceLabs?” Well, even if you have SauceLabs setup for your continuous integration, I think you’ll still need something setup while you are creating your tests. Yes, you could run without the grid while you are writing your test and use the grid as part of your continuous integration process, but my experience is that the grid works just enough differently that you are really better off creating your test using the grid.
In my current situation, I have a virtual machine setup to run my test.