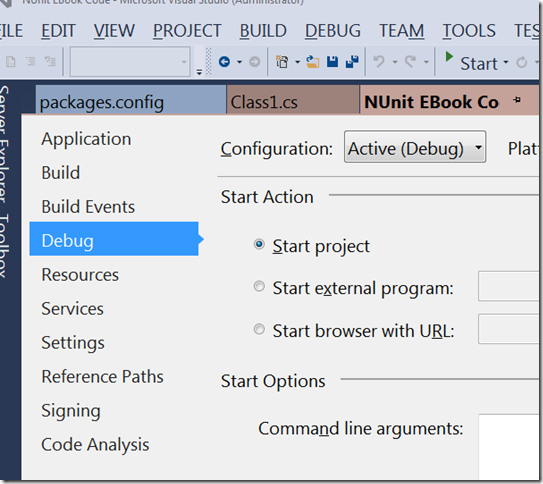
For the purposes of this post, I’m going to assume that you already have the NUnit Test Runner installed. The question you are looking to get answered is, “How do I run NUnit from Visual Studio” or even more importantly, “How do I DEBUG NUnit test from Visual Studio”. The following step by step should help you.
Right click on the project in Solution Explorer that represents your test project.
From the resulting menu, select “Properties.” In the resulting window, select the “Debug” tab from the left-hand side of the window.

You will want to select “Start external program” and point it to the UNnit runner that got installed when you installed NUnit.
Now, whenever you run this project, with or without the debugger, NUnit will start up.
Note: there is no reason to pass parameters telling it what DLL you want to run because it will load the last DLL it had up.
But, if you wanted to do that, you could pass the location of the DLL as a parameter to the GUI runner.
There are other parameters you can use.
Check the documentation for the version of NUnit you are using for the specifics.
If you are running .NET 4.x, you’ll want to go to the location in your file system where NUnit.exe lives and find the NUnit.exe.config file.
Find the startup element (<startup> .... </startup>) and place this line in between the open and close startup tags:
1 | <supportedRuntime version="4.0" /> |
If you miss this step, you won’t be able to debug your 4.0 code. Alternatively, you can just set your project to use .NET 3.5. So, let’s give it a try. First, put some code in the test method you just created. For our purposes, we’ll just put in a console writeline so we have somplace to put a breakpoint.
1 | public void MyFirstTestMethod() |
Next set a breakpoint on the Console.WriteLine method and then run your project with the debugger.
Once NUnit loads the DLL, click the “Run” button in NUnit.
If everything is setup correctly, you should stop on the breakpoint you set.
You may have noticed that we put several Console.WriteLines() in our code but they aren’t displaying anywhere. So, where did they go? How can we see them? By default the “Text Output” tab displays all of the Console.WriteLine() messages as well as all of the test results. If all you care to see is the test results, you should select the “Errors and Failures” tab. Personally, I prefer to work in the “Text Output” tab and I suggest that you do the same.
As an alternative to this, you can just pick up a copy of ReSharper, which has an NUnit Test Runner built into it. All you need to do to debug a test is selection the test and choose debug from the context menu. It will save you a ton of time.
Another option would be to pick up the MS Test Adapter from nunit.org. But, I’ve never liked the way MS Test renders the tests results. So, I don’t recommend it. Obviously, your mileage may vary.